Tuesday, March 28, 2017

Franken-patterning Katherine Tilton Patterns

 I made this swing top tunic in mid-January, after the big home dec project in my previous post, and wore it to our winter sewing retreat.  The Tilton sisters are so creative and I've combined two of their patterns plus my Pamela's Patterns Perfect T to come up with  unique variation.  
What do you get when you add up the side panel and pockets from this pattern

to your T shirt base and sleeves of this

and the zipper edge collar of this?


This...


These are all Fabric Mart fabrics that I played with for a few days and did some preliminary sketching.  My collar stands up because that one textured dark grey double knit gives it more body than the rayon knit used by Katherine Tilton. I also lowered the neckline 1 1/2 inches and had to make the neckline pieces longer to fit.  I think it is such a cute detail.  When I make another version with summer fabrics and collars I will use lightweight colored zippers but these were just standard zips from my resource center.  

It's cozy and a little stylish for my casual life.  I wore it to the sixth annual Winchester, VA Northern Virginia American Sewing Guild chapter retreat, one of my favorite events each year.  Next post I'll share the very few projects that actually got made during that weekend.  Until then, I'll share a few pics of what I'll be seeing on one of the bike rides I love taking here in Florida.


I think you can understand why it's hard to leave this beautiful area...

Monday, March 27, 2017

New Season, Old Projects

Since I have not posted in more than two months I have lots of catching up to do...both in reading about the projects of my fellow bloggers and trying to get through the back log of unposted sewing items from my workroom.  Happily for me, that won't take long which means I have time to read about the marvelous items I see momentarily on my Bloglovin feed while waiting in line.
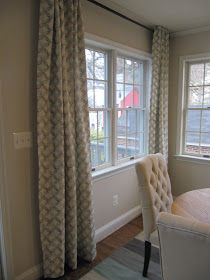
Let's go back in time, dear friends, to mid-January when I was getting ready for both my highly anticipated Winchester, Virginia sewing retreat followed by the drive to southwest Florida for two months.  Of course I worried about what shoes and clothes to bring....but more importantly what sewing projects, machines and notions would make the journey.  On top of that I was determined to not leave Baltimore until I finished a big home dec sewing project.  So let's start these posts with that project...four full length drapery panels for my renovated family room.  
DIY lined hidden tab drapes


Let's talk construction details.  These are lined, hidden back tab curtains.  There are several nice blog posts about this style and I particularly liked the youtube video from the onlinefabricstore.net  I did make some slight changes to make mine look a little more like a "workroom" not factory version.
The major challenge to project like this in our 1933 built home is finding space to lay out 8 3/4 feet of fabric.  Yes, it's on the floor and that means I am getting up and down on my knees for each panel several times....all the more reason why it took me four months after I bought the fabric to tackle this project.
Lay down the fabric and cut the length plus the bottom hem and top header.  


Measure for a 4" hem doubled for the bottom...fold, press, then hem.  Here's where I varied and used my much-loved blind hem foot.


Pin that hem for blind-hemming...
 Since this is heavy home dec linen I used a wider, longer stitch

blind hem detail on inside

The blind hem foot takes just a little stitch out of the front fashion fabric of the panel and moves along the edge of the inside hem section.  The finished result looks more polished, IMNHO, than just straight stitching the fabric.  

Nearly invisible blind hem from the fashion side of the panel
Now add the lining panel.  I used Roc Lon no stain from JoAnn's...with my trusty coupon, of course.
Do the same hemming technique, simply making the hem a doubled 2" hem and arranging it to be two inches higher than the panel.
Rolling out the lining before cutting it...on my knees again


Once the lining hem is sewn, then it was time to get back on the floor and hem the two long sides for each of the four panels.  That meant first turning and pinning the two layers of fabric once, then going back and doing it again, then blind hemming those long sides.  
Side fashion and lining folded once...tip, cut off or at least cut into the selvedge so it won't "pull" the fabric
Side pinned in place before blind-hemming
Peaking inside

Hem and side 
Are you tired of getting up and down yet?  Only one major part now, the top header to the panel.  I sewed a six inch header at the top.  Then I stitched several yards of four inch tubes, turned them with my Fasturn tube turner Fasturn set  and cut them inch five inch pieces.
With the hems at the bottoms and sides the panel became a little easier to manage in my sewing room.


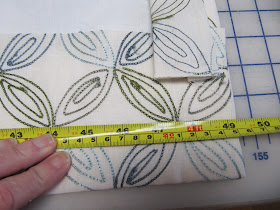
My finished panels measured 49" and I used seven hidden back tabs, stitched 2" from the top of the panel.


Then it was a "nice day for a hanging"  and Mr. Lucky installed them on a set of Target rods.  


Inside peak at those hidden tabs in action

"Training" the panels to stay in those soft pleats.
The panels did exactly what I had hoped.  They soften the hard edges of the room, keep a vertical line in the room but don't block our much needed light in this north facing part of the house.  Done and happy.

To end the first of a few upcoming posts I thought I'd share a too-appropriate quip from a friend ...

I hate when people accuse me of lolly-gagging when I'm quite clearly dilly dallying.

Hope you have fun doing whatever you enjoy in your sewing space.