So, are you a "Pinner?" My new unproductive passion, Pinterest, continues to inspire me with pictures of beautiful rooms, smiling children and delicious plates of food. Now I realize that all of those are merely photographs and that reality is far more complicated, but those pictures do mesmerize me at times. But this blog is not Pinterest. No pics of beaming grandchildren on vacation with me, nor do I have a food stylist present when I'm dishing up dinner (even if it is scrumptious) and my pictures of a room in our household always seem to include some electronic charging cords and the rear end of a dog or two. But I know that we are all nosy about one an other's lives so I'm going to share some of my ongoing summer sewing room improvements. It's a work in progress and I'm happy with the progress I'm making.
It started this year with a change in lighting. Just last year Mr. Lucky (my DH from henceforth called " a saint) replaced an '80s overhead fan and hanging light fixture (yes, with classic frosted scalloped globes) with this cool looking set of five lights that I found half price at Home Depot. Ah, the reason it was half price must have been that it only gave off half the light I needed to find my way around this room. Dim, full of shadows and the lights kept blinking off on their erratic power strip connection. So this year I knew I needed a huge increase in wattage just to make this room really usable and enjoyable for these aging eyes. Mr. Lucky spent one entire day re-installing new ceiling lighting for me, a genuine headache because we have old wiring and he forgot to write down the connections when he took off the old. Up and down, basement to second floor to turn off the power, turn on the power, turn off the power and try another combination. He worked it out eventually and now there's a not as attractive but marvelously bright 4 "sunshine bulb" fluorescent box in that ceiling. Oh my gosh, the difference is has made is almost indescribable. Colors are clear and realistic, no more shadows and I love working in there any time of day or night. I'll post new and improved lighting pics in the future.
 |
| Former hip but impractical celing lighting fixture |
 |
| Ikea cabinet full of knit fabrics that constantly distract me with possibilities |
 |
| "Tres Chic" fabric focuses my attention on the fashion project at hand |
 |
| The Saint recovering and reassembling my Ikea chair |
 |
| Voila! |
 |
| Usually it has little post it notes with the pattern info in each drawer
One of the frequent techniques showing up on Pinterest has been simple instructions to make chalk paint in any color. This room could use some color so I decided to put it on these drawers and make them into something useful. Pink paint to the rescue. I used a coordinating pink from the fabric colors, almost Pepto Bismol like.
|
 |
| I chose Pink Cafe from Behr paints |
Did a primer all around the drawer cabinet and applied one coat of the pink to all four sides.

After that base coat I filled an empty sour cream container with my chalk paint formula....one cup of paint mixed with 2 T of unsanded grout that I lightly mixed with water. I applied two coats to the drawer fronts and to one side of the cabinets.
After the paint dries, rub chalk over the entire surface to sort of prime it and then use it as a chalkboard.
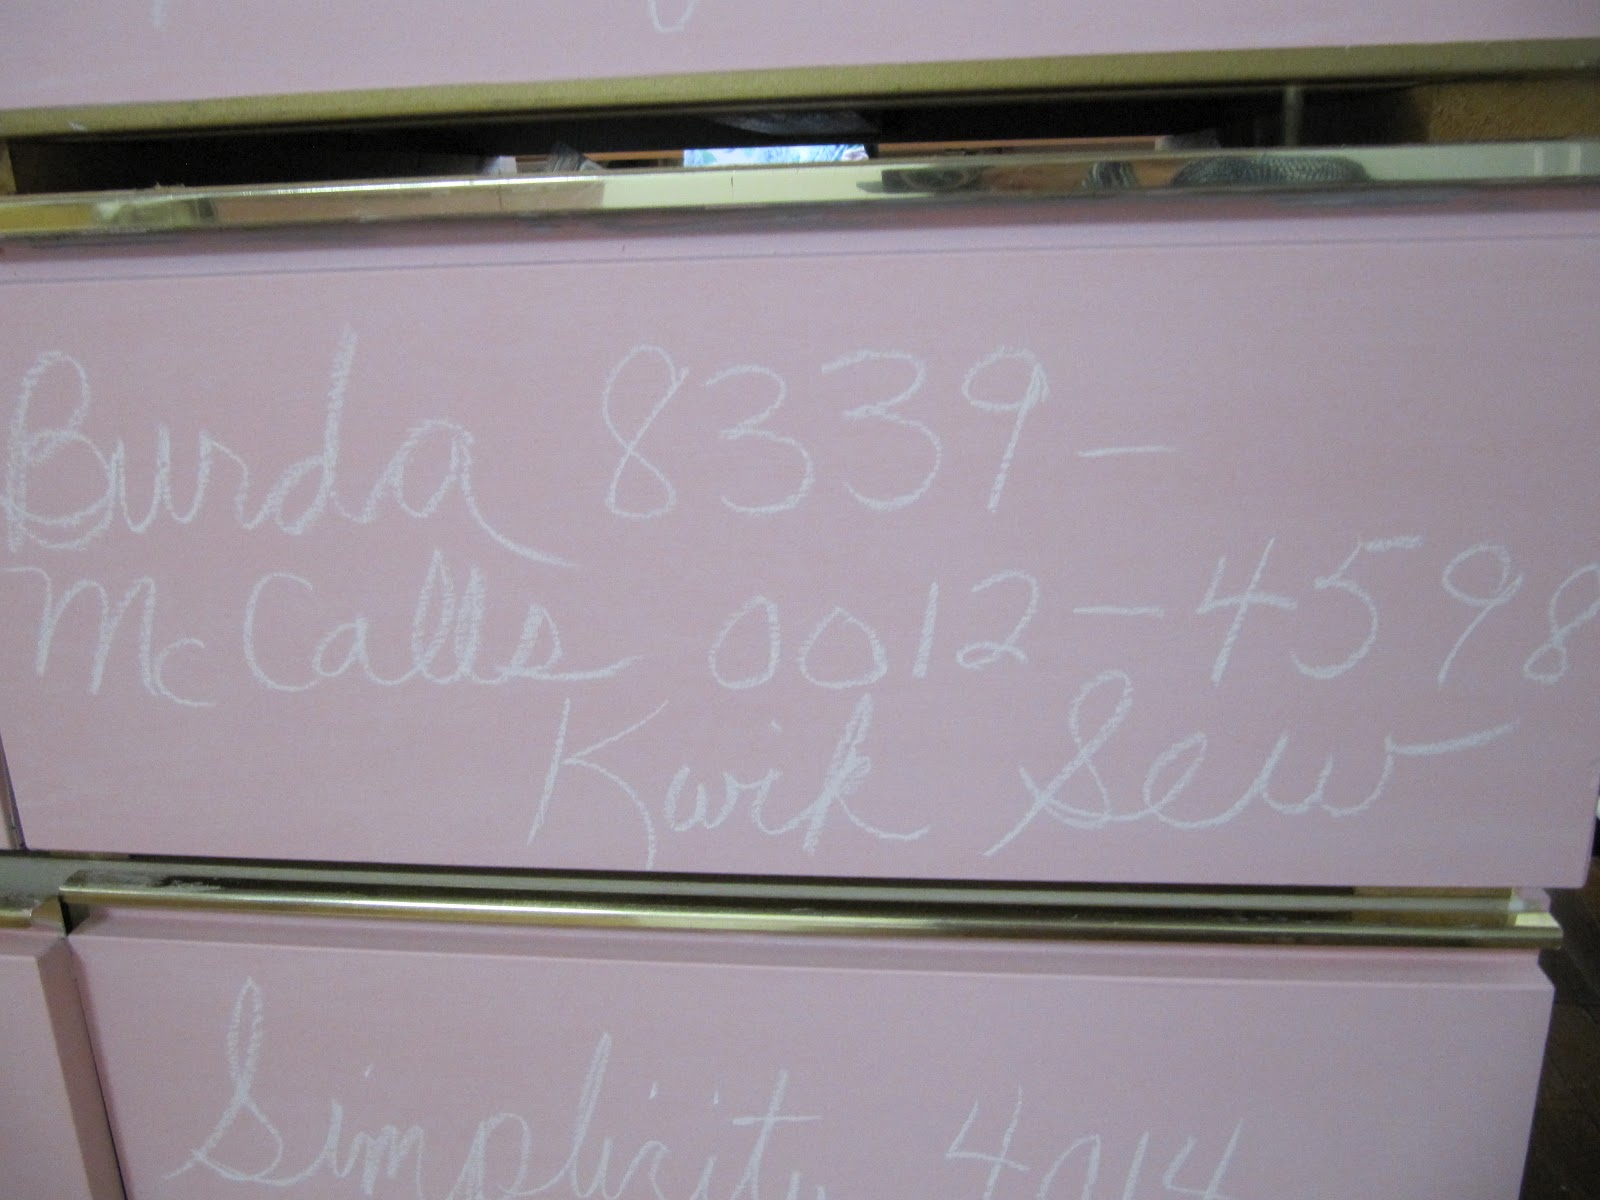 |
| Now I can easily see what patterns are in each drawer and change the info when needed |

I loved my new chalk paint so much that I made a little extra gift for a dear friend's birthday party last wek. Yes, you can apply chalk paint to glass....and change the message any time you like:


Back in the sewing space... I made a stencil from a metal decorative dress form that I bought on Etsy a few years ago....aren't these three cute?


This side of the pattern cabinet faces a wall and my dressform so it is just decorative. I love the stencil image welcoming me I walk in the room.
 |
| Third side of the cabinet |

I'm loving the aesthetic improvements in my sewing space and have been sewing up a storm in the last week. Thanks for stopping by. Now I'm going to take a blog tour and visit some other sewing rooms around the world.
Any chance I can rent you and Hubby out to revamp my room???? It looks super!!!
ReplyDeleteWe're slow workers so you definitely would be better off renting us by the job and not by the hour! Thanks so much.
DeleteJane-
ReplyDeleteLOVE it! Can't wait to see it up close and personal!
You are too kind....and your design sense is always my inspiration, Michele.
DeleteEnjoy your new sewing digs! Re-organizing and sprucing things up usually brings on some sewing mojo!
ReplyDeleteThanks so much, Gwen. How true. The lighter, brighter room definitely got me recharged.
DeleteIts great!!! Love the pink chalk board paint!
ReplyDeleteThank you. You may be enjoying the inside of my house but I've been marveling at your new chickens and that wonderful pumpkin crop outdoors.
DeleteLove the changes to the room! I have been meaning to paint an old pattern file cabinet that my mother-in-law got at a fabric store closing. You have inspired me to get to that sooner than later.
ReplyDeleteWhat's the rush? I waitied at least 8 years to even consider painting. No wonder I only make up OOP patterns.
DeleteWhat changes, it looks so good. And special thanks for showing the possibility of changing the cover of the chair. I have a VERY boring cover on my chair, this is giving me an idea to follow.
ReplyDeleteThank you! My cushion was an uninspiring dark green previously so I like the change. .
DeleteSo cute! I hope you enjoy this room so much it inspires your sewing!
ReplyDeleteA lighter, brighter room is definitely more enjoyable....and you and all my sewing friends keep inspiring me with new garments.
DeleteWhat fantastic new upgrades to your sewing room!
ReplyDelete