Sunday, August 28, 2011

New Pattern Company, New Jacket,

Despite trees down all around us, our home escaped unscathed from last night's Hurricane Irene.  A little damp corner in the basement, a few power surges and short outages but we've been happy to have full power and the eventual sunshine after the storm.
Today turned out to be a "summer snow day."  The hurricane's rain and high winds happened mostly after midnight and it was merely blowing heavily when daylight broke.  With so many activities already cancelled and our full power available, it was the perfect opportunity to head to my sewing room and finish this project.

Let me introduce my new jacket, the earthquake and hurricane week version, from a new pattern company, Fit for Art Patterns.  This is their first pattern, the Tabula Rasa Jacket, available for sale in two sizes on their website.  Fit for Art Patterns

Upfront disclaimer:  I've known Rae Cumbie for about 10 years when I met her in a wearable art group.  I've always admired her eye for combining fabric and textures and she was voted Baltimore's Best Tailor some years back.  When she decided to work with her partner, Carrie Emerson, on designing a pattern for weavers, quilters and other fabric artists, she allowed me to be a tester for this pattern.  Back in February she sent me a newly drafted pattern so that I (along with others in her groups) could make a mock up and test the directions.   Now the pattern has been printed along with a 16 page booklet of design, fit and sewing instructions.  Jacket sewing weather is resuming here in MD and it was time for me to make my first version of this jacket.
I've blogged before that I generally have avoided many typical art to wear or  artistic design patterns because I find them too oversized and shapeless.  I especially dislike dropped shoulders on garments.  Since Rae knows fashion sewing, and her audience, she knows that many of her potential customers would look better with bust darts and shoulder lines.  So this pattern has an A/B bust front with one dart in the square armhole and a C/D bust front with two darts...that's the one I used.  There's a square armhole and therefore no traditional set in sleeve but the jacket is designed with a shoulder seam.
I used five different fabrics in this jacket but I kept it very tone on tone.  They are all silks or silk blends from Fabric Mart that I collected over the years.  The lining is a rayon from Fabric Mart as well.  I did a very subtle flat piping on that shoulder seam to make it stand out a bit more.

I think you can see all five fabrics here as well as the two bust darts.  I used snaps and some faux Chinese coin buttons from my collection for a closure.
I did add shoulder pads to my jacket and a small interior pocket.  I'm rather pleased with the fabric combination and overall look of the jacket but I will reduce the front width by about 1/2 inch on each side, add more shaping to the side seams and add some length for my next version.  Yes, a next version.  On their website photo gallery Rae and Carrie are positively inspiring with the many versions of this jacket.  It's unlikely I'll ever do a quilting cotton one, just not my style, but I like the shear fabric ones and also am considering a double knit one for winter as well as an ikat fabric one.   Hope you enjoy looking at their website.    It's been a fun project for me and a lovely way to spend such an intersting week.  

No earthquake pictures from Thursday but here's how things looked on our block earlier today:


Friday, August 26, 2011

What's Your Lining?

The jacket is coming along quite nicely and I'm just about ready to cut out and add the lining. Bleeech.   I dislike sewing jacket linings but I love having them in a jacket.  The slippery fabric takes more time to layout (yes, I use old newspaper underneath) and it frays annoyingly as I sew plus there's no give so easing means pleats sometimes.  (Can't you just hear the whining...)  But I'm almost always happier when I've made this decision to line a jacket.  It's worth the hassle, I just needed to complain before I buckled down and did it. 


No major pictures but I will say that the four neck darts did their proper job and also look sort of cool.   I did something a little unusual for the interfacing.  Rather than interface the upper back before I sewed the darts, I stitched down the darts then applied the fusible interfacing over them.  I made sure to press it on over my ham to keep the curve necessary but it seems to have turned out well.
Jacket back at neck after fusing


Since I'm combining fabrics in this jacket, I did some combination testing today.  Here's the flat piping sample that I decided to use.


Speaking of linings, I want to give some praise to Fabric Mart once again.  I've been using up some lightweight stretch poly lycra lining that I bought earlier this summer.  I've made a half dozen stretch woven sheaths and the same number of Pamela's Pegged Skirts with this lining fabric.  I wouldn't use poly for a jacket but it's been wonderful to have inexpensive stretch lining for these other two projects.  Yesterday I called and asked for a new supply in a range of any colors and my box arrived this afternoon.  $2 a yard and there's plenty more in store, I believe.  But I think you may have to ask Chris or Sandy for these specifically since I did not see these linings on the website.  


We're heading out to the last Little Italy outdoor movie this evening.  It's traditional to close with the charming and touching "Cinema Paradiso."  The sun is still shining and people will be enjoying the evening but we're also getting regular hurricane updates regularly.  My church has already cancelled Sunday services.  I'm planning on making a drive to the sewing retreat in Northern VA tomorrow to just visit for a few hours....and fill up the car with wine from Trader Joe's.  But I'll be checking the morning radar along with lots of other people along the East Coast in case I have to make alternate plans.  Plenty to eat, drink and read in our house but I do miss my electricity when it goes.  Hope you have a safe and enjoyable weekend wherever you are.

Thursday, August 25, 2011

Pattern Alterations Before Fabric Selection

My next JAM (Jacket A Month) project involves selecting four or five fabrics from my resource center that work together.  That would have been an easier task earlier in the week when there was lots of daytime sunshine all around.  But this morning there have been heavy clouds and thunderstorms for several hours and my sewing room, and most of my house is too dark and dimly lit for me to make those decisions.  So instead I'm adjusting the pattern.
Normally I do not need too much of a rounded back adjustment and if I do, I seldom mind having a center back seam to make that adjustment an easy one.  But for this jacket I wanted no back seam so I had to pull out my fitting books to remind myself how to do this.
I believe that I have almost every fitting book ever printed.  These three are the ones I turn to time and time again.  
Fit for Real People is my first choice.  I like the fact that they include various styles and alternative methods for making particular pattern adjustments.  The styles may seem dated...although I did read that vivid color blocking is making a strong comeback....and I find their use of real life models illuminating and encouraging.


The Perfect Fit is useful because it shows me the same or similar alterations with actual pattern tissue.  Sometimes I'm a literalist and want to see that change done on an actual pattern.  Their focus on one alteration broadcloth example versus an entire garment is also helpful when I am fixing one thing at a time.  


I bought this last book years ago when Judith Rasband was working at the sewing expos.  I think that her eye for figure analysis is wonderful.  This book can overwhelm me sometimes but it definitely ranks high for its thoroughness and options.  If I were really going to focus on fine tuning a very fitted garment then this book is the one I would turn to first.


Here's my rounded upper back alteration.  I liked the idea of two neck darts which will also add some design elements to the jacket back.  No, I haven't shown you the pattern yet.  That will come after I make my fabric choices in the light of day.  In the meantime, remind me to get better lighting installed in my sewing room so this problem goes away.

Wednesday, August 24, 2011

The Power of Pictures

Most bloggers have commented that the photographs they have taken have caused them to look and think twice about the subject matter.  Maybe it's about how well a garment fits.  Sometimes it's about the scale of a print....or the location of a few motifs on a body.  The camera was useful on my last project for showing me what didn't work about one of my embellishing ideas.
It is enlightening and surprising as to what the camera reveals and what it also conceals.  I'm thinking a lot about this topic in the last two weeks since I am getting a chance to see pictures that have been "hidden" from view for more than 40 years.  My brother is scanning a collection of family slides from our childhood and sending me the pictures.  I have the strange sense of being totally familiar with the setting, the people, of course, and yet being remarkably surprised and shocked by what I am seeing.  My family took slides rather than photographs since slides were less expensive to have developed.  On occasion we would pull out a projector and screen and project these slides to the boredom delight of visiting family members.  But my parents left that home more than 38 years ago and I had already been gone for six years by then.  So these pictures are both old and new to me.  
On the sewing front, one of the things that jumps out at me is that I have pretty much the same body shape and posture that I did as a child.  I have a rather columnar body which might be thicker or thinner over time but is still a column.  That low right shoulder from scoliosis is evident in my earliest pictures.  Mildly surprising that I was never diagnosed and I distinctly recall my mother hemming coat sleeves one Easter and telling me that my right arm was longer than my left.  Nope, turns out that my right shoulder is dramatically lower than my left but otherwise they are just arms.   
1964 or 65

So if the "Mad Men" art directors want to get 60's details right, they can just give me a call and we can examine some of these pics for clues.  I've selected these few to share with you because all of them show me wearing something my mother sewed for me.

Also, I know you'll get a kick out of this picture in particular.  This is the very first year, most likely 1963, that my family could afford to rent a small bungalow at the Jersey shore   These were plywood 2 bedroom, 1 bathroom and about the size of a two car garage, a whole huge development of them, reach-out-and-touch-you close to one another.  My mother packed food and groceries so we wouldn't have eat out except for the one evening that we went out for her birthday.  Let me tell you, staying for a week at the shore, going to the boardwalk one or two nights and spending every waking hour on the sand or in the water....was better than a summer at the Hamptons or some beach in Greece.  These are happy, fun memories for me.  But what I had not remembered was that we had to bring our Sunday best clothes for Mass on Sunday.  I howled out loud when I saw this picture.  Yes, my dress isn't the best for my size and body type (I was my tallest by the following year) and my mother's dress is beautifully tailored but seems to have been an upholstered chair in another life....but did you get the gloves?  In all the packing and preparation that had to go on for this trip my mother did not forget her Sunday gloves.  


The last picture was taken at my grandparent's home.  My how our picture and expectations of grandparents have been changed by baby boomers.  I think you can tell from our clothes and body language that my grandparents were friendly but reserved around children, not the fun-loving grandparents of today.  I'm also very glad today that clothing for tweens has dramatically changed.  I'm wearing something that would have been appropriate on my Betsy McCall paper doll but I'm in 5th or maybe 6th grade and could definitely use a wardrobe do over.  


No sewing going on here but I am starting a new jacket project that needs some planning and design work before I cut out the pieces. 


 In the meantime, I am canning away.  Last night was a wonderful new red pepper jelly recipe from this new pectin that I had read about, Pomona.  Pomona Pectin  The recipes can easily be made low or no sugar and the package contains enough for several batches.  I've made eight jars of peach preserves and these five of red pepper jelly and I still have maybe half of the package to use.


50 lbs of tomatoes are turning into tomato sauce and also this wonderful creamy gazpacho recipe that I've adapted from Cooks Illustrated.
Creamy Andaluz Gazpacho


the raw materials of my latest projects


Monday, August 22, 2011

Goldilocks Draped Cardigan

Remember those Three Bears and Goldilocks?  I have a lot in common with her in the past month while I was working on Pamela's Patterns Draped Cardigan.  The first one was too small, the second was too big, the third was just right.   I'm a happy girl in this final version


I started out using the same sizing process for this Draped Cardigan as I had for Pamela's Patterns Perfect T Shirt earlier this summer.  But the 1/2" petite upper chest adjustment was a squeeze too high  under the arms in version one.  OK, for version two I made only a 1/4 inch petite adjustment but the loosely woven knit was too long on my torso.  This 3rd version is 1" shorter and has my usual  center back seam, swayback adjustment and slightly widened/lengthened sleeves.  


Once I was satisfied that I had the fit, then I sewed this one up in a heathery olive green wool knit from Fabric Mart.  I adore this fabric and have more to play with this fall.  Since fall was on my mind, I just couldn't leave it alone, however, and wanted to add some tone on tone embellishment to make it all mine.   Knowing that sewers always have opinions I thought I would play with a few ideas, take some pictures and ask what you, my lovely dear readers, thought I should do.  I hope you don't mind, but I made the decision without you.  Those digital cameras really work wonders . 
Looks like green spiders are attacking my face and neck
I cut out some leaf shapes one evening while watching "Memphis Blues," stitched them into some odd flower shapes and came up with this terrible idea.  In my head it was sort of cute.  On the cardigan it is a big, leggy mess.  No need to ask you your opinions, it was remarkably clear.  Ugggh.
What to do with all of these petal/leaf shapes?  I started arranging them on the cardigan and liked the overlapping, slightly falling look.  But then I had to decide how to attach them.  I considered hand stitching leaf veins down each one with embroidery floss but even I , who enjoy hand sewing, wanted to get this cardigan done after a month of failed versions.  Too much time.  Glue would be a lot faster although it probably wouldn't work well on this wool knit fabric or would leave it bulky and uncomfortable around the shoulders.  Ah ha, thanks to cleaning up my sewing space the previous week for a dear friend's visit, I spotted my Viking ER10 Embellishing machine just sitting on a table looking very unused. Viking ER10  Those five needles worked together to quickly mesh together the shapes I had cut to the jacket body.  In less than thirty minutes I had roughly attached all the cut leaf shapes and could decide to alter the arrangement or add more details.  
The petal pieces have been lightly felted onto the cardigan to check for placement


The 5 needle head
I could have stopped there and been satisfied with what I wanted to accomplish but I went one step further.  I have some rovings that I've collected from various sources over the years and decided to add some subtle color and more texture to the leaf shapes.  The needles again just punched the loose roving into the fabric shapes.  Now the jacket has some greens, grey and brown texture which echoes the tones that are in the jersey itself.  
The roving piece on the left has not been felted yet.


Thanks to Pamela Leggett for another wonderfully easy pattern to sew Pamela's Patterns and it's officially now part of my JAM count.  In the heat of the summer I lost my motivation for jacket sewing but now that there's a hint of fall's arrival I'm interested in pursuing that goal again.  Another one of these cardigans and I'll be back on the right path.
Oh, you wanted to see the cardigans for the other bears?  
Too little....but I'm working on adjusting it.  
Version two...too big.  And please, don't make Goldilocks wear prison stripes even though she did break and enter.  What could I have been thinking when I bought this fabric?


Speaking of fabric, thank you for the correct info about Fabric.com and their free return shipping and guarantee.   You've convinced me to give them a try again.  


Saturday, August 20, 2011

One More Before You Go

Before I officially folded up the tissue for Simplicity 3678, I sewed up one more with this 1 1/2 piece of ITY knit from Fabric.com.  I seldom ever order from them and when I did this summer I only liked 3 of the 6 items in my order.  Even with "free shipping" that's not a good enough ratio for me so please, don't let me do that again.  Yes, I know they would refund my money but shipping it back at my expense sort of wipes out most of that benefit.  


This was one of the knits in the box.  I like the colors but the scale of the print meant that I changed my plans from a knit top to this dress.  I eked out this sleeveless version of Simplicity 3678 with about two inches of fabric to spare.  To make it look a little different I added a braided trim that I made using my Fast Turn tube turners, a purchase from Nancy's Notions many years ago.  These tubes and little wire pulling hook make turning tubes easy and quick.  I recall years ago turning tubes of fabric using the old "safety pin worked through the tube" method....what a PITA.   Nifty little notion to make the job easier.


I like the texture on the dress.  I think a larger version of this braid would also look nice as the midriff band on another version....but that won't be happening soon.  I have folded this one up and am ready to move on to something new.
Here's a great fast turn tube demo if you've never seen them.


Thanks to everyone who made such nice comments on my last post.  Since recipes are just as much fun as sewing, here are two more that I'm taking to our picnic and dance this evening.  It's our very favorite band so we'll be dancing the night away under the stars.
First is this new dish that I got from the New York Times last week.  I did have to buy "pomegranate molasses" at Wegman's but it turns out not too difficult to find if you have a large grocery store or Whole Foods nearby.  It adds a zesty sweet and sour flavor.  Now I know the ingredient that I enjoy in Lebanese and other Middle Eastern cooking.   Fresh tomatoes and eggplant and some chickpeas and yummmm.
New York Times image
Sweet and Sour Eggplant, Tomato and Chickpeas

I don't have pictures of my own version of these next treats so I'll link you to a food blogger with much better photography skills than mine.  Now, it you are on diet or a no sugar/flour food plan, then you may want to stop reading here.  I understand and admire you.  Part of my own particular food/weight challenge over the years has been finding balance in my life.  So when I started a program more than a decade ago to lose weight and find some serenity around food, I found a program of spiritual, emotional and physical balance which still works for me.  Part of my food plan therefore is allowing myself dessert once a week when it fits into my active lifestyle.  This is my treat for tonight, Cook's Illustrated Perfect Chocolate Chip cookies.  I don't feel deprived, I get to share them with friends who will be there also and now you can try them and see what you think.  Oh, I make about 30 smaller cookies and bake them for 11 1/2 minutes.


Published May 1, 2009.   From Cook's Illustrated.
WHY THIS RECIPE WORKS:
Our perfect chocolate chip cookie recipe had to produce a cookie that would be moist and chewy on the inside and crisp at the edges, with deep notes of toffee and butterscotch to balance its sweetness. Melting the butter gave us the chewiness we were looking for. Cutting back on the flour and eliminating an egg white also improved texture and brought the brown sugar flavor to the fore. To give our chocolate chip cookie recipe the crisp edges and toffee flavor we wanted, we let the sugar dissolve in the batter for 10 minutes, then baked the cookies at a high temperature so the edges darkened while the centers stayed soft.

MAKES 16 COOKIES

Avoid using a nonstick skillet to brown the butter; the dark color of the nonstick coating makes it difficult to gauge when the butter is browned. Use fresh, moist brown sugar instead of hardened brown sugar, which will make the cookies dry. This recipe works with light brown sugar, but the cookies will be less full-flavored. For our winning brand of chocolate chips, see related tasting.

INGREDIENTS

  • 1 3/4cups unbleached all-purpose flour (8 3/4 ounces)
  • 1/2teaspoon baking soda
  • 14tablespoons unsalted butter (1 3/4 sticks)
  • 1/2cup granulated sugar (3 1/2 ounces)
  • 3/4cups packed dark brown sugar (5 1/4 ounces) (see note)
  • 1teaspoon table salt
  • 2teaspoons vanilla extract
  • 1large egg
  • 1large egg yolk
  • 1 1/4cups semisweet chocolate chips or chunks (see note)
  • 3/4cup chopped pecans or walnuts, toasted (optional)

INSTRUCTIONS

  1. 1. Adjust oven rack to middle position and heat oven to 375 degrees. Line 2 large (18- by 12-inch) baking sheets with parchment paper. Whisk flour and baking soda together in medium bowl; set aside.
  2. 2. Heat 10 tablespoons butter in 10-inch skillet over medium-high heat until melted, about 2 minutes. Continue cooking, swirling pan constantly until butter is dark golden brown and has nutty aroma, 1 to 3 minutes. Remove skillet from heat and, using heatproof spatula, transfer browned butter to large heatproof bowl. Stir remaining 4 tablespoons butter into hot butter until completely melted.
  3. 4. Divide dough into 16 portions, each about 3 tablespoons (or use #24 cookie scoop). Arrange 2 inches apart on prepared baking sheets, 8 dough balls per sheet. (Smaller baking sheets can be used, but will require 3 batches.)
  4. 5. Bake cookies 1 tray at a time until cookies are golden brown and still puffy, and edges have begun to set but centers are still soft, 10 to 14 minutes, rotating baking sheet halfway through baking. Transfer baking sheet to wire rack; cool cookies completely before serving.

Eat Live Run food blogger with CI Perfect Chocolate Chip Cookie recipe  You might like the step by step pics on this blog entry.


Happy weekend, everyone.

Wednesday, August 17, 2011

Something old, something new...

I think I love this pattern....no, I absolutely positively love this pattern.   I made it back in May as a dress for the first time (Simplicity 3678 in a solid color with more details ) and last week I wanted a lighter weight summer dress.  Here it is!  No zipper and the hardest part is marking and then pinning the darts. 


Speaking of darts, I did have to do a FBA and spread the pleats to do that:


I mark my pleats with Saral tracing paper then at my cutting table I pin them together before moving the pattern pieces over to my machine.  Years ago when I was sewing I was much less careful about marking and handling my pattern pieces and my results were less than pleasing.


 I used a large print ITY knit from the Northern VA Sewing Guild NYC visit to Kashi at Metro in May.  For some hem weight I used my coverstitch machine and did two rows of hemming on the bottom and sleeves.  


It's the kind of dress that can go to church or dinner with some accessories but can also run errands with flats and be wonderfully comfortable.  Next on my list is a sleeveless version to wear with my collection of little cardigans.  Have I said that I love this dress pattern?


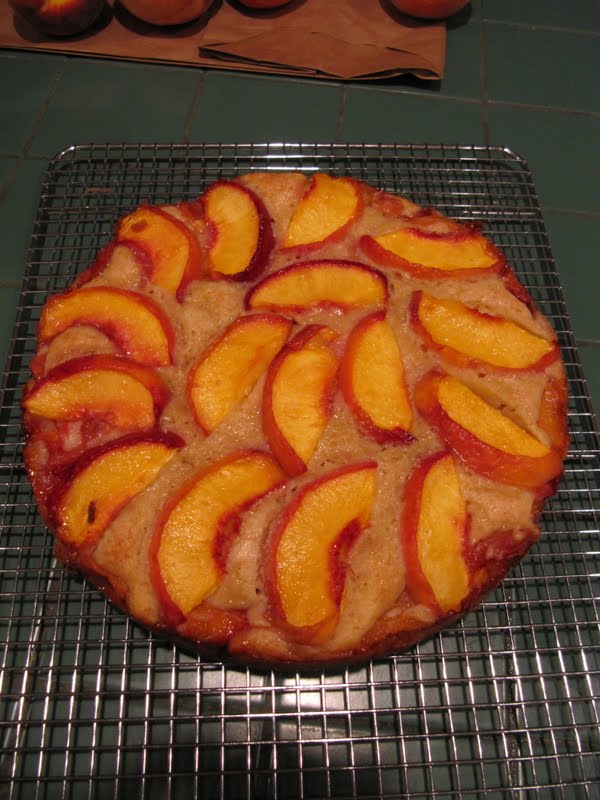
Ok, since this pattern is now officially an oldie and a goodie, here are two things which are new and are goodies.  Remember all those peaches from last week?  Not all of them turned into peach preserves.   (Oooh, you should taste the the second batch of those preserves.  I added a dash of Penzey's Spices  Double Vanilla  Penzey's  at the very end...peach vanilla perfection!)  
Here's what else I made with the peaches since we had plans to return to our outdoor picnic and dancing venue on Saturday night.

The recipe is a little fussy since it's from CI but it's the best peach cake I've ever made.

SERVES 8 TO 10

To crush the panko bread crumbs, place them in a zipper-lock bag and smash them with a rolling pin. If you can't find panko, 1/4 cup of plain, unseasoned bread crumbs can be substituted. Orange liqueur can be substituted for the peach schnapps. If using peak-of-season, farm-fresh peaches, omit the peach schnapps.

INGREDIENTS

  • 2 1/2pounds peaches , pitted and cut into 1/2 inch-thick wedges
  • 5tablespoons peach schnapps
  • 4teaspoons lemon juice
  • 6tablespoons plus 1/3 cup granulated sugar
  • 1cup (5 ounces) all-purpose flour
  • 1 1/4teaspoons baking powder
  • 3/4teaspoon salt
  • 1/2cup packed (3 1/2 ounces) light brown sugar
  • 2large eggs
  • 8tablespoons unsalted butter , melted and cooled
  • 1/4cup sour cream
  • 1 1/2teaspoons vanilla extract
  • 1/4teaspoon plus 1/8 teaspoon almond extract
  • 1/3cup panko bread crumbs , finely crushed

INSTRUCTIONS

  1. 1. Adjust oven rack to middle position and heat oven to 425 degrees. Line rimmed baking sheet with aluminum foil and spray with vegetable oil spray. Gently toss 24 peach wedges with 2 tablespoons schnapps, 2 teaspoons lemon juice, and 1 tablespoon granulated sugar in bowl; set aside.
  2. 2. Cut remaining peach wedges crosswise into thirds. Gently toss chunks with remaining 3 tablespoons schnapps, remaining 2 teaspoons lemon juice, and 2 tablespoons granulated sugar in bowl. Spread peach chunks in single layer on prepared sheet and bake until exuded juices begin to thicken and caramelize at edges of sheet, 20 to 25 minutes. Transfer sheet to wire rack and let peaches cool to room temperature, about 30 minutes. Reduce oven temperature to 350 degrees.
  3. 3. Spray 9-inch springform pan with vegetable oil spray. Whisk flour, baking powder, and salt together in bowl. Whisk brown sugar, 1/3 cup granulated sugar, and eggs together in second bowl until thick and homogeneous, about 45 seconds. Slowly whisk in butter until combined. Add sour cream, vanilla, and 1/4 teaspoon almond extract; whisk until combined. Add flour mixture and whisk until just combined.
  4. 4. Transfer half of batter to prepared pan; using offset spatula, spread batter evenly to pan edges and smooth surface. Sprinkle crushed bread crumbs evenly over cooled peach chunks and gently toss to coat. Arrange peach chunks on batter in even layer, gently pressing peaches into batter. Gently spread remaining batter over peach chunks and smooth top. Arrange reserved peach wedges, slightly overlapped, in ring over surface of cake, placing smaller wedges in center. Stir together remaining 3 tablespoons granulated sugar and remaining 1/8 teaspoon almond extract in small bowl until sugar is moistened. Sprinkle sugar mixture evenly over top of cake.
  5. 5. Bake until center of cake is set and toothpick inserted in center comes out clean, 50 to 60 minutes. Transfer pan to wire rack; cool 5 minutes. Run paring knife around sides of cake to loosen. Remove cake from pan and let cool completely, 2 to 3 hours. Cut into wedges and serve


The unfortunate unexpected part was that we were thunderstormed out of going so we had to stay home with cake, homemade whipped cream and DVR'd episodes of "Rescue Me." Am I the only one who gets weak in the knees at that bad boy Dennis Leary?  I blame  my early years of Catholic school where I learned to love wise-acre, smart-mouthed Irish Catholic rebels. 
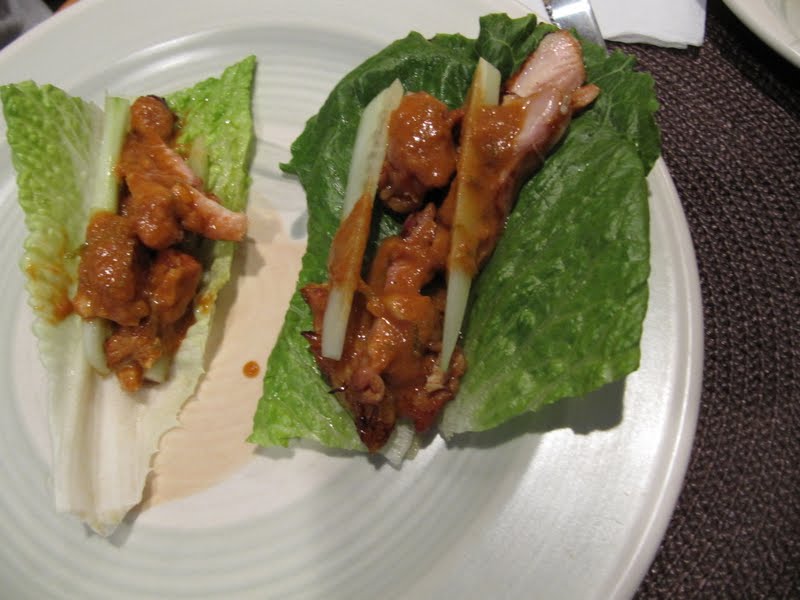
Since we spent our carbs on dessert, we had a low carb dinner with these great Thai Lettuce wraps.  The recipe is scrumptious and the best part is the terrific peanut sauce.  I've made several peanut sauces over the years and this one is my favorite.  

 The recipe source:  The Cheeky Kitchen Blog
 Thai Chicken Lettuce Wraps
Serves 6 as an appetizer or 3-4 for dinner, alongside quick fried rice or noodles.
  • 3 Tbsp lime juice (from 2 fat limes), divided
  • 1 Tbsp lime zest
  • 2 Tbsp Thai red curry paste, divided
  • 6 Tbsp brown sugar, divided
  • 3 lbs chicken breasts, thinly sliced
  • 1/4 cup water, plus a few tablespoons
  • 1/4 cup smooth peanut butter
  • 2 cloves garlic, chopped
  • 1 shallot, chopped
  • 2 Tbsp soy sauce
  • 1 Tbsp fish sauce
  • 1/2 small cucumber
  • 1 small red pepper
  • 1 head boston or butter lettuce, washed and separated into leaves
Make marinade.  In a food processor, whiz 1 1/2 Tbsp lime juice, 4 Tbsp brown sugar, and 1 Tbsp red curry paste.  Pour into a large bowl and add chicken slices to the bowl.  Toss well to coat evenly and set aside for at least 10 minutes (up to an hour).
Make peanut sauce.  In same processor bowl (no need to wash it out), add remaining 1 1/2 Tbsp lime juice, all the zest, remaining 1 Tbsp curry paste, remaining 2 Tbsp brown sugar, water, peanut butter, soy sauce, garlic, and fish sauce.  Whir until smooth and combined, about 30 seconds.  Pour into a small serving dish and set aside.
Assemble fixin’s.  Wash red pepper and cucumber.  Slice each into thin, long strips (think of a french fry – you want them to lay alongside the chicken strips neatly in the lettuce wrap).  Wash the lettuce and carefully separate each leaf, taking care to leave them whole.   Arrange lettuce, peppers and cucumbers on a platter with the peanut sauce.
Grill chicken.  In a grill pan (alternatively, thread onto skewers and grill outside), grill chicken strips for 1-2 minutes on each side or until well caramelized and cooked through.
To serve, use a lettuce leaf like a tortilla to wrap up 1-2 chicken pieces, a slice of cucumber, and a slice of pepper.  Drizzle with peanut sauce, roll up, and serve.

OK, enough of my favorites today.  I'm working on a new pattern and will be asking your opinions in another post.