Showing posts with label Burda 6809. Show all posts

Saturday, April 18, 2020

Create What You Love

Seven weeks ago I bought this magnetized pin holder when we were just starting our rental month in an adorable house in north Naples, FL.  At that time it seemed like it was an encouraging message to create the things you love.  More than a month later I think it means create the life and world that you love and that's something deeper, more thoughtful and more hopeful.

Eloquent people are writing about quarantine, politics, the anger, fear, sadness, empathy, caring, even the hidden gifts of isolation.  Me, I’m not so full of wisdom at a time like this.  Instead I'm going to share what's happening in my little corner of the world because a few non-sewing friends have asked about masks and many friends are sharing how they are managing social isolation and more ideas are always better.

The masks I've made and donated through local Domesticity Studio Domesticity Studio Baltimore Maryland per local hospital requests have followed a pattern put out by Red Poppy Red Poppy Mask tutorial (version C for hospitals) which I used because the hospital approved it.  But I made some slight variations for the ones I am now making in mini-assembly line.
Hospital donation pile


I struggled for a little while (my powers of concentration are definitely suffering) because I wanted a more streamlined system for making these en masse.  Here's my procedure...yours may differ, of course.

I batch cut out a dozen masks at a time and I use the men's version unless it is for a very small woman or child. For these giveaway masks I don't use elastic...hard to find and hard to wear all day.  Instead I cut 1 inch strips of knit fabric (sewers have knit fabric, non-sewers just cut up an old t-shirt...finally a use for all that wasteful fast fashion) pull the fabric to form a rounded cord.
Fabrics for this batch are cotton shirtings from last summer's enormous haul at Fabric Mart A S___load of Shirting  and cotton batik also from Fabric Mart, both tightly woven premium fabrics. And I have yards of knit fabric in my resource center at any given moment.  

I serge that center seam and the sides although they can be sewn just as easily.  Serging is just quicker and then Mr. Lucky is helpful since he cuts apart the chain stitched pieces.


Then it's back to the sewing machine to assemble.  Turn under the lining side seams for a finished edge. 

Sew the front and lining right sides together along the top ridge and bottom chin area. Trim the seams to be uneven for easy topstitching after turning.
Top of mask seam sewn, trimmed and top intersection trimmed.
Turn mask right side out.  Edgestitch the top seam and the bottom seam to hold the seams in place.  Sew a channel 3/8 along the top of the mask, about three inches on either side of the center seam.  This channel will hold a removable wire so you can seal the top of the mask closely along the bridge of your nose.
Front of mask with edgestitching along top and bottom and 3/8 " channel for wire
Now turn the side seams in by 1/2 inch and stitch down to form a channel for the ties.
You'll notice on the pattern picture above I added a 1/2 more width to the original pattern piece.  Must be my plump squirrel cheeks but I wanted everyone to have more face coverage all the way towards their ears.)
Mask with side seams stitched into 1/2 channel...and optional knit fabric to go in the pocket
Insert knit ties or elastic with a helpful safety pin.

I used two strands of thing floral wire...and only my PAPER scissors to cut the wire

Now learn how to use a face mask properly or you've defeated the purpose.  How to put on and remove a face mask

For sewing friends, this process is almost second nature and many of you are churning out one version of several that are requested.  I'm looking at a few other variations that I'll be making and using in the coming months.  Yes, I think masks will be the new fashion statement for quite awhile and I'm ok with that for your safety, my safety and the safety of all the people working to keep us healthy and fed and clean.  I'll post about those as I start to make more for our household and for friends but here are some links that I think are useful.  
Trend Patterns sew along and pattern
Neoprene mask...but please don't turn it inside out
Custom size masks at Free Sewing

I have worn my mask a few times when I've gone out for my almost daily three or four mile walk and was fairly happy with the result.  The nose wire let it fit my face closely enough that the mask moved when I breathed deeply which I have heard is a sign of a decent seal...note that I'm not a medical person nor do I play one on TV, just want to protect you and me in public places.
The mask did move with breathing and didn't fog my glasses on my walks


But I'm not able to sew these all day long.  It makes me too afraid and especially too angry.  So I did reach a point where I was ready to sew some things for myself.  These two projects were cut out and part of my Florida sewing plans.  Since we packed up early and left town weeks before our rental ran out, I had them ready to pick up and complete in Baltimore.  

Since April has been quite chilly, I appreciated having this Hatchi animal print fabric to make another Pamela's Pattern Draped Front Cardigan. Draped Front Cardigan  


I've had luck in the last year underlining several knits and did it again with this cardigan, underlining the front and back pieces with a thin maybe swimwear lining fabric from Fabric Mart.  I basted them together inside the seam allowances after cutting out both fabrics.  After stitching them as one, just serged to finish but that wasn't even necessary since knits don't ravel.

Hatchi knits are nice but since they are thin they can be a bit "sticky" and having to tug down on a top or cardigan all day is annoying.  The knit underlining just gave it wonderful body and drape and it skims over jeans and leggings.  


Pamela and I were on the same wavelength last year because she just wrote an article about that technique in the #206 December, 2019-January 2020 issue....doesn't that feel like a decade ago already. 

And then it was time to tackle something for the coming warm weather, another Burda 6809, this time in a silky all cotton Tori Richard fabric from Fabric Mart.  

Uneven mitered side hems

Vintage lace seam trim which I found while looking for elastic to use and donate to other mask makers

Why is this girl laughing in the midst of a global pandemic?  While Mr. Lucky was taking this shot and I was holding the mask I made for myself with this coordinated lining, he told me he thought it might have been the bikini bottom I would be wearing this summer.....big needed laughs from all of us, right?

And if you can stand more mask making humor, check this out...

Here's hoping that you are creating what you love.  No, I don't like creating masks but I do like creating what I see in my neighborhood, community, state and world...hope, helpfulness, persistence, compassion, determination, generosity.  Next time let's share how we are distracting ourselves when we can.  


Wednesday, March 21, 2018

Winter Begone

Spring is officially here in North America so that means it is most likely time for me to wrap up my posts for the small amount of winter sewing I did this year. Yes, it might just be that I have a procrastination contrarian dominant gene in my lineage since my blog posts don't seem to be matching the seasonal sewing schedule.
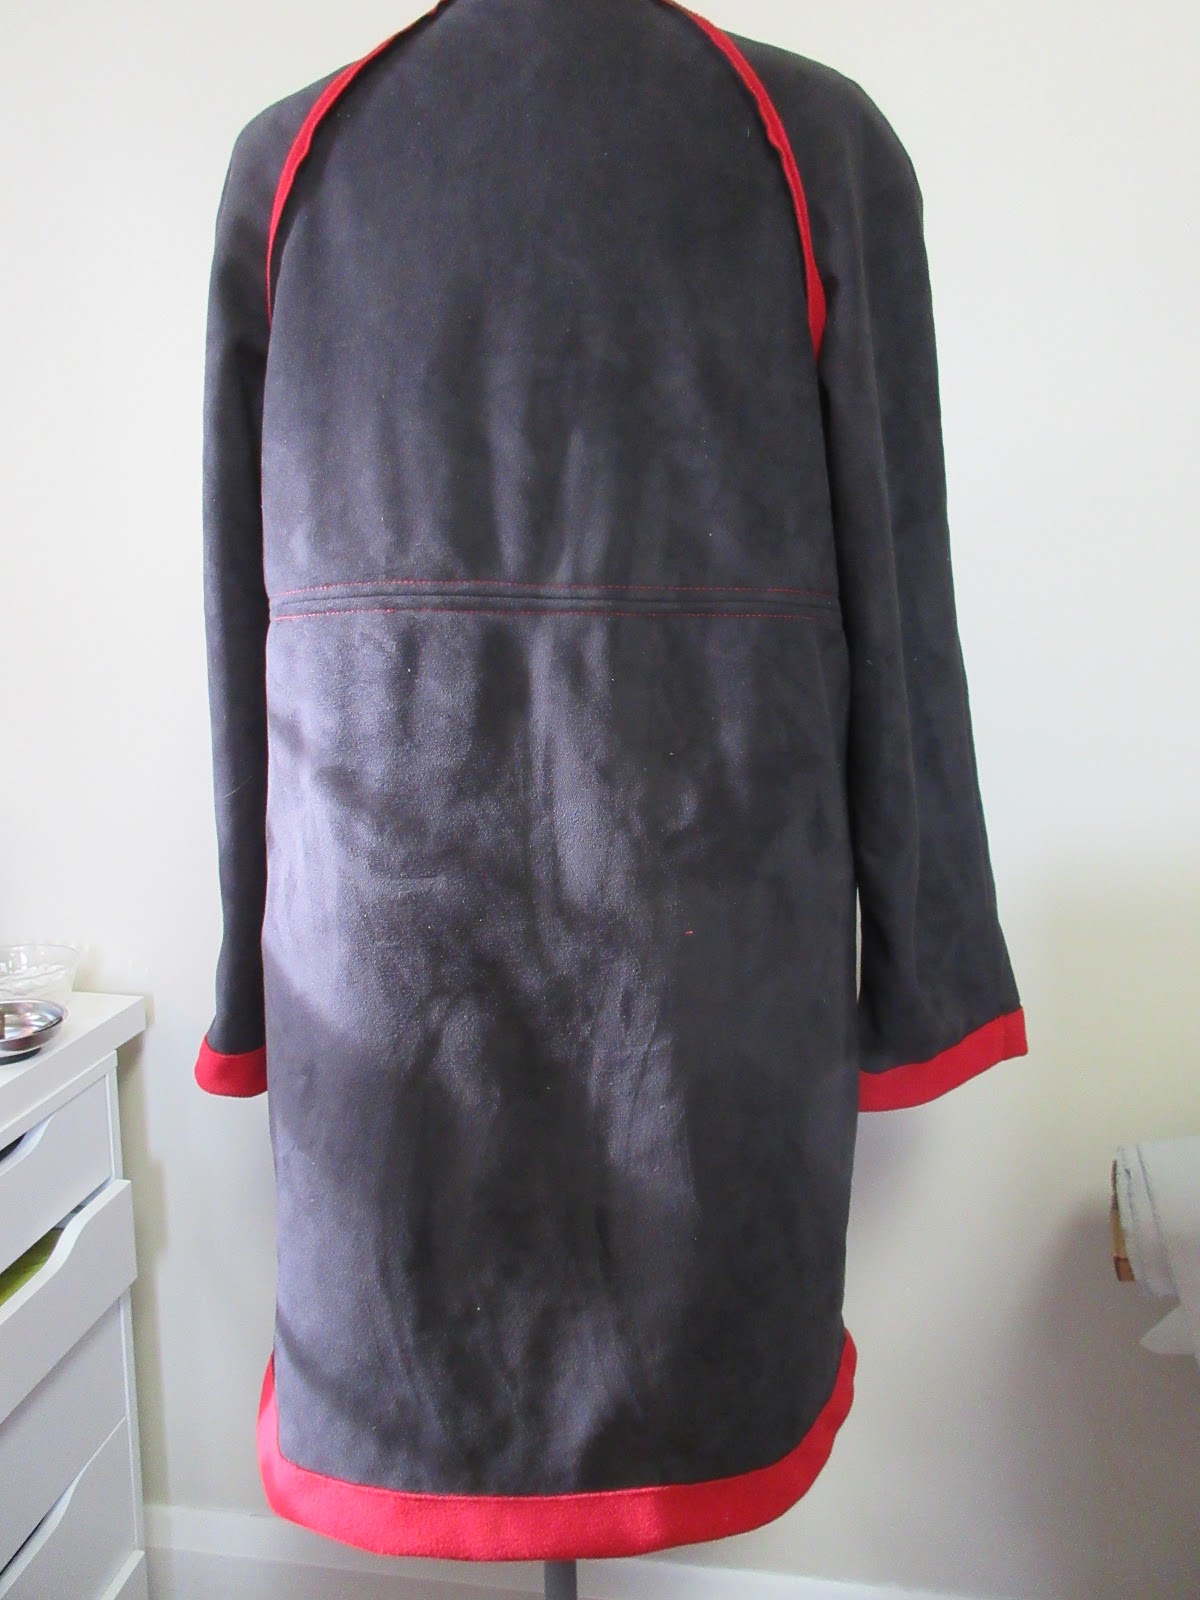
Back in last season I accepted a FB sewing group challenge to sew a winter coat.  Then several weeks later I ended up buying two gorgeous vintage wool coats at a hospital charity sale and my enthusiasm for a tailored winter coat project died but my desire to sew up some interesting fabric in my stash did not.  I had purchased a double sided faux suede polar fleece combo fabric, Fabric Mart, of course, for a few dollars a yard thinking that it could serve as a coat mock up if nothing else.  Since I no longer needed a heavy wool coat I dug out the fabric and found a pattern that would suit it perfectly...New Look 6536.  I had been doing some tedious and un-photogenic work with Sarah Veblen at the same time so I took the mock up for this coat and we both agreed that this pattern has terrific bones. 
 I was reluctant to give it a try since normally I don't like raglan sleeves.  They usually have folds of fabric along my arm and an unflattering uni-boob look.  But after Sarah made some minor tweaks...a little more room on the armhole seam which is where the bust shaping happens and a large wedge of fabric in the sleeve armscye area.  (Silly me, I didn't realize that yes, raglan sleeves have a sleeve cap and I just needed more sleeve cap height to get rid of those ugly folds.)  
Mock up with sleeve wedge added 
The fabric was relatively easy to sew.  I used a microtex needle and of course did not press the fabric with my iron, since it is polar fleece, merely steamed it, finger pressed it open and let it dry in place.  
New Look 6536
I forgot to take pictures of my topstitching....there's so much of it that I was glad it was DONE.  But I did use two threads in that same needle and was happy with the result.  


Since the fabric wouldn't press totally flat, I did stitch down the seam allowances in two area, along the top arm seam and along that mid-body seam.  I really wanted those seams to be flat and not curl.


New Look 6536
It is the perfect warm but lightweight coat that I need and will wear a great deal in Maryland.  Easy topper to throw over a tunic and jeans and those pockets mean I can run errands and walk the dog without worrying about a purse.  No, it's not the elaborately tailored coat that I imagined appearing on these pages back in the early autumn months.  But it is perfect for my climate and my life and that's what sewing lets us do.
The rest of my winter sewing was a variation on more TNT patterns.  Burda 6809 is one of several tunic patterns that I simply love.  It's got a retro sixties vibe to it and so far my versions have been summery ones.  This winter I wanted to use some bright emerald green embroidered silk dupioni that I picked up on the giveaway table from last year's sewing retreat.  I wanted to make the front collar opening and the cuff have some contrast.  Sarah Veblen helped me by looking for a darker forest green scrap that I could possibly use but that was too much green happening, even at the holiday time of year.  As she I spoke I looked again at the fabric and realized that it was just chain stitched contrast thread on that dupioni....so at home I unpicked about 18 inches of the fabric (sorry again, I was sure I had pictures but no luck finding them.)  There were holes in the dupioni that sewing people would notice but once I lightly interfaced those pattern pieces and pressed them, they simply looked as textured as the silk.  Now I had a perfectly matched coordinating fabric.  I used it for the front collar opening and then made a sleeve cuff pattern with a wedge to mimic that front point.  I was quite happy with the final result and planned to wear it to my book group holiday party.
Burda 6809

Testing the sleeve cuff
But my plans changed when we had a polar vortex hit us in early January.  Suddenly this silk tunic and skinny pants outfit was totally inappropriate for a winter party in the even colder hills of Pennsylvania.  TNT pattern to the rescue.  Here's Pamela's Pattern draped front cardigan in a Fabric Mart  hitachi print knit with a vintage mink scarf added for some extra warmth.  This cardigan just takes a few hours to complete and felt cozy and comfortable.
Pamela's Patterns Draped Front Cardigan
The rest of my winter sewing happened at our winter sewing retreat.  Since I already had the pattern out I decided to bring along another cardigan for which I had another vintage fur collar.


I used a Lisette Butterick 6244 pattern for this waterfall jacket.  I especially like this pattern because it has a neckline dart under the waterfall collar.  That gives some bust space and also a slight lift to the collar area which I find more flattering that the previous waterfall patterns I have used.  I changed the waterfall drape itself by copying an Eileen Fisher silk jacket that I have loved for years.  This is my first version in a very sheer poly from Fabric Mart and still needs to have the edges serged with a rolled hem. One of the nice things about the Eileen Fisher one is the doubled hem on the bottom and the sleeves which gives the silk a nice weight.  I have been saving some Anna Sui silks and think this will do them justice.

Eileen Fisher jacket
Well, Mr. Lucky and I are still enjoying our Florida winter sojourn.  We have friends from church staying in our Maryland house this month while they have a renovation in the works and they sent snow covered back deck pictures yesterday.  We have white stuff on the ground, too...
 but in another ten days we will be driving north, back to gardening, back to pick up my sewing machine from its repair visit and back to fun in my sewing room.  I still have some snoop shopping to do here before I leave so I will report what catches my eye.  Here's hoping your seasonal sewing is going well in your part of the world.

Tuesday, April 4, 2017

Burda 6809

My January sewing retreat projects started with this tunic pattern which I planned on taking for our Florida vacation.  Well, after two months my Naples friends might be tired of seeing it but I am not.  Love the pattern and can't wait to make a slew more.  
Burda 6809

I had only some minor alterations to this Burda pattern...which should be a clue to me...sew more Burda.  I shortened the back 1 1/2 inches and made the side dart 1/2 deeper.  I added 1/2 inch to the bicep area of the sleeve which was easy peasy to do since this is a nice two piece sleeve.  
At the sewing retreat I was a little very befuddled by the placket directions and had to walk through the instructions with an experienced friend who frequently sews Burda patterns.  Once I did it, yes, the directions made perfect sense.  That little point at the very bottom is quite tricky stitching but my fabric was very forgiving. 
It's burn-out polyester but lightweight enough that it doesn't feel clammy.  I do need to wear a camisole underneath so it wouldn't be suitable for the hottest and most humid summer days in Maryland.  But a nice linen version would be comfy and I think I see a knee length linen dress in my future.  
I wore it to visit a former classmate in Sarasota....and fell in love with Sarasota on a brief visit.  
I wore it again to meet up with my local Naples sewing girlfriends which is always a delightful afternoon.
Not all my sewing retreat projects worked out so well.  Next up I'll share one that needs more work and editing before I'm happy with it.  Until then, I hope you have a project that pleases you when it is completed.